Pages

Sunday, February 2, 2014

One of the Trailers I Didn't Buy (and Why)

Yesterday, I took the opportunity to go look at a 1960s camp trailer advertised for sale. It was one you might have called on yourself, were you in the market.

It had a cute profile, with a front kitchen and original aqua appliances. The original upholstery still looked great. No dents in the body, and the paint didn't look too bad. I'd already spoken to the owner, who described the trailer as ready to go camping.

'No water damage,' he said when I asked. 'Just look at the vent photo in my ad.' (It appeared pristine.) 'New tires, too,' he added. "Not even 50 miles on them.' He also possessed the No. 1 item that I insist upon: the trailer's title, valid and in his name. 

The drive to see the trailer took pretty close to 3 hours. It took less than 3 minutes for me to decide I would not be buying it.

I snapped these few quick photos that will help explain why.


Strike 1:
I pulled up alongside the trailer and this caulked (but dried-out and cracked) corner was the first thing to meet my eye. 'This has leaked before and is most likely leaking now,' I thought. I also noted what seemed to be a small break in the skin, just to the right of the light cover. With every rain, water will have gotten inside, between the skin and interior paneling.
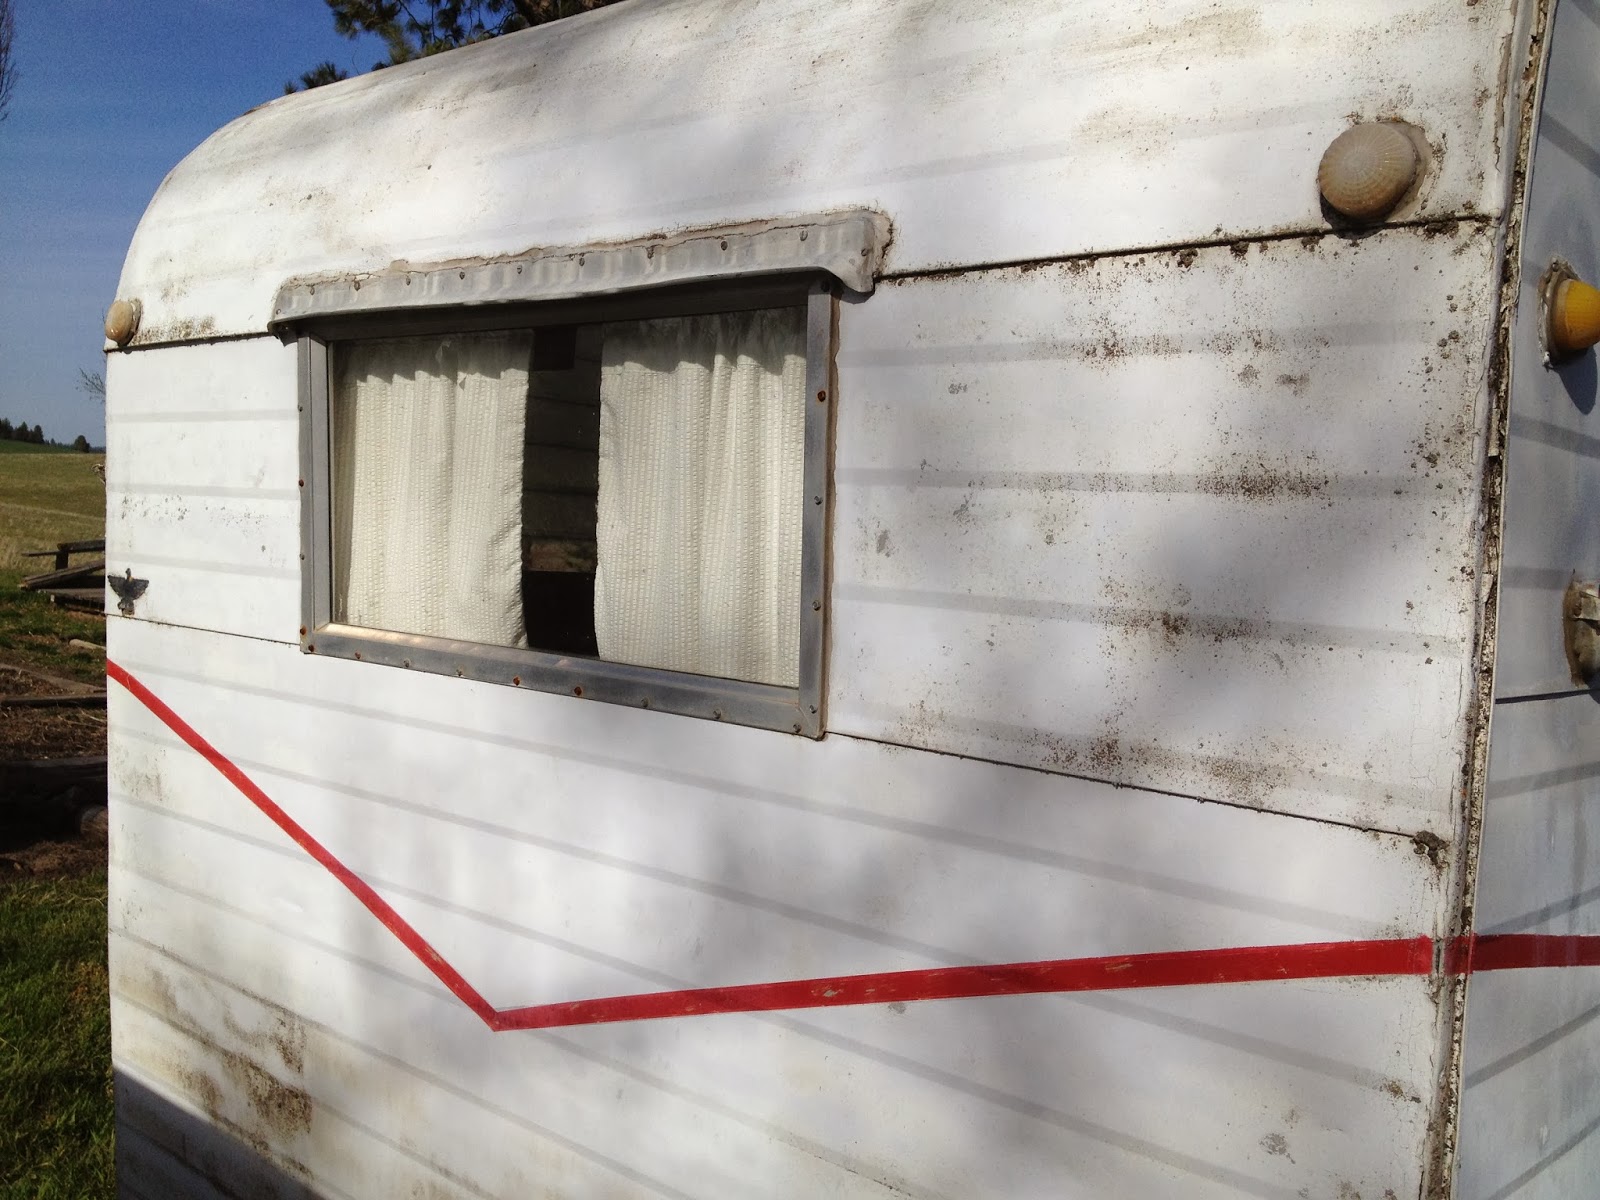

Strike 2:
Around the trailer on the curb side, the metal rain rail, or eyebrow, was missing over a window. In its place was a length of black tape. The tape wouldn't have kept water out for long, meaning there would very likely be more to fix than just a missing rain rail. Water, trapped behind a wall, sets up a perfect environment for frame rot.

Strike 3:
All the tires, including the spare, were car radials rather than STs (tires specifically made for trailers). And, even with little mileage, they didn't qualify as new; the date code showed them as made in 2006. That meant they'd been sitting out in the weather, quietly breaking down, for nearly 10 years. For safe road use, this trailer would need a fresh and correct set of tires. (Note: You can pretty much figure that almost any older trailer you buy will need new tires. But if an ad says 'new tires,' don't take the claim at face value--look those tires over for yourself.)

Furthermore:
The pull-out step beneath the entry door was missing, and the rear bumper was bent on the curb side. As both these 'injuries' were on the same side, my guess is that the trailer got hung up somewhere, on something, while being towed, tearing off the step and bending back the bumper.

I didn't have to go inside to know that I'd be passing on this trailer. Too much 'not good' had added up already for me to want to take it on.

But, as long as I was there, I did go in (of course--who can resist an open trailer door?). The aqua appliances were darling, and on their own, would have swept many a gal right off her feet. The interior was clean, with a nice new rug at the front door.


 I lifted the rug, and there was a new part under it, too--where a piece of faux wood had been tacked down over the original flooring in order to firm up a soft spot.


Inside a cubby, right by the front door, the warped vinyl gave away just how much water had entered this part of the trailer. The flooring was soft and rotted from the front corner back. 


This is the interior wall beneath the window with the missing rain rail. I pulled the wall cushion back to reveal the warped paneling. (Always pull those cushions back, by the way; they can cover up significant damage.) Warped paneling is the result of water damage.


Remember the front exterior corner with the cracked layers of caulking? This is the interior of the same spot. It's inside a dark closet--where it could be overlooked by someone during her haste to buy.


The other end of the closet had leak evidence, too. 

Had I been looking for a tear-down project at a salvage price, that would have been one thing. But having seen what a trailer's frame looks like when there's this much water damage visible inside, I couldn't find the value in the owner's asking price--or even half the asking price.

Without dissing his trailer in any way--never necessary, and not cool--I thanked the owner for showing it to me, said it wasn't quite what I was looking for, and wished him good luck with his sale. 'No problem, ' he said. 'Three other people wanted me to call them back if you didn't take it.'

By the time I got home later in the afternoon, his ad had been taken down. Someone else had purchased it.

Which just goes to show, there's a trailer out there for every owner, and an owner for every trailer.

And, I hope this also goes to show that it's always best to see a trailer with your own eyes before you commit to buy it. This seller knew how to hit all the right description-buttons in his ad ('new tires, ready to go camping'), and with his photos of the trailer's good features. But the total package didn't pencil out.


Monday, January 20, 2014

First of Our 2014 Getaways


It may be January, but that doesn't stop the urge to get out, get away, and get together--not for the Girl Camping Girls!

So, when a bout of dry weather came along last week, three of us pulled the plug on everyday life and headed for the trailers we have parked for the winter at a low, snow-free spot on the Salmon River. This is our view as we descend from the colder, snowier zones up north.


And here is our little enclave as seen from across the Salmon.


We arrived, unlocked our trailers, turned the heaters on, and poured glasses of wine right away, even before the chill was gone inside. Happy! Campers!


This is Miss Sherry's Outback, Pistol Pete. It's roomy enough for her to bring her kitty and her dog, Jada.


Here we have Trigger Happy, Miss Mig's Hobo. (Pure coincidence about the trailer names both referring to firearms.)


This is my 'tin can cabin,' dubbed Hacienda del Sol. It's a 1972 Airstream Land Yacht.


This is her 'little captain,' G'Petto. He's a Schipperke, a breed developed as a boat dog.


I have this fabulous '57 Aljo as my next-trailer-neighbor.


Though it got down to the 20s at night, daytimes were sunny and pleasant enough for us to do some local exploring. This is about a mile or so downriver from our camping area, which is near the left end of the bridge.


For most meals, we pooled our groceries and took turns cooking or putting out snacks and drinks. One of Mig's breakfasts consisted of scrambled eggs with fresh onions, on pitas topped with fresh avocado spread and strawberries on the side. Yum.


One night, we went for a nice meal at the local small-town supper club. Sherry treated us…thanks again, Sherry!


By chance, we happened to be on this trip when the moon was full. With clear skies, the nightly moonrises and moonsets were incredible. This is shortly before the moon dropped behind the divide that separates the Salmon and Snake rivers.


One morning, the moon was lit by this aura as it slipped away from sight. It looked as bright as a sun. (That look was deceptive, however, as everything outdoors was covered in frost.)


All we had to do to warm up was to go back inside our trailers--I sure didn't mind this view of the Salmon from the rear window of mine--or go stir up the campfire. No obligations and no worries.

A fine four days!


Tuesday, January 14, 2014

A Frame for Cleaning J-Rail Trim


J-rail, also known as rain rail, is the aluminum trim that follows the basic shape of your trailer. Once you've removed it for a painting/resealing project, you'll probably need to clean it of old silicone, butyl tape, paint, moss buildup, and so forth.

Trouble is, it's easily bent while you're doing all this to it. Then it's difficult to get a good seal behind the segment that's tweaked.

To prevent this, and for ease of handling and storage, you can screw the trim onto a wood frame made of three pieces of lumber. Half a dozen screws are enough to hold the trim down firmly enough for cleaning and polishing.

Monday, January 13, 2014

Painting a Trailer: What I've Learned (So Far)


Last spring, I was the lucky beneficiary of a free trailer--a 1961 Aloha compact. I had never painted a vintage trailer before, but there was no question that the trailer needed a fresher face than this (seen on the day I brought her home).

What did I have to lose? I'd probably never get a better opportunity to learn as I went along. Here's a look at the progress so far:


I'm now making plans to paint another trailer, and based on what I've learned from this one, I'll do this:


* Strip the lights, trim, and windows. If I'm going to go to all the time, filth and bother to do a paint job, then it's worth it in the long run to reseal the trim and all the windows with new butyl tape and sealant. It's also a lot easier to do the sanding and other prep for the painting itself when you don't have trim to worry about. (Tip: Leave the windows in until you're done cleaning and resealing the roof. You'll end up with less mess inside.)


* Deal with the roof first. If the roof leaks, and even if it doesn't, there's no point in doing anything else until you're sure the roof is OK.  The toughest part is getting the surface cleaned, especially if there are layers of old roof coating up there. Prepare for this to take a while. Instead of using caulk, I applied Eterna-Bond roof-seal tape over the seams and around the vent cover. The tape is 4 inches wide,  hyper-adhesive, and designed to grip through a wide extreme of temperatures. It comes in a roll, like duct tape, and you press down a piece cut to match the length of the seam. That part goes fast!


* Prepare for long periods of The Uglies. There's nothing pretty about the cleaning/sanding/priming process of getting prepping a trailer for paint. You will get filthy. And tired. And sweaty. And discouraged. You'll be assaulted by fine particulate as you're grinding and sanding, and will wear a respirator if you're smart.


* Wait for optimal painting conditions.  After you've gotten this far, it's tempting to forge straight ahead with painting, but don't do it unless conditions are just right. Read the label on your paint, for optimal air temperature and humidity conditions. I had this trailer at the primed stage by the end of July, but by then, it was too hot to paint it, even in the shade. I ended up waiting until early October before spraying on the top coat.


* Clean and polish the windows and trim before reinstallation. Check out the window and trim in the top photo, then compare to this one. Take my advice, and go power-tool for this job; I used Mother's aluminum polish and a hand-held electric buffer with cone-shaped head, also by Mother's, that I bought at my local tire store.

* Stock up on stainless steel screws. These are the best for putting everything back together again.


* Spring for the cost of new light covers. There's nothing very redeemable about faded, brittle, 40-and-50-year-old pieces of plastic. In the overall scheme of things, the cost of new light covers and flanges isn't all that great, and they add so much to the makeover, overall.