Pages

Showing posts with label vintage trailer rot repair. Show all posts

Tuesday, January 12, 2016

Rot Repair 101, Continued

I can testify: Until you've done it, the idea of taking your vintage trailer apart for rot repair is daunting (use this link to go to Rot Repair 101, the earlier post on disassembly).


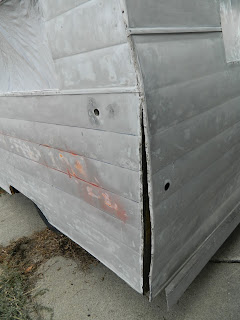
This is my 1965 Shasta compact, which sat under cover for 6 years until I learned the take-apart process with another trailer.

Thanks to my guinea-pig trailer, which turned out great, I lost my fear of removing pieces of a trailer, and also learned that the simple construction of a small vintage trailer makes it less complicated to fix than I'd feared.

Shastas have a reputation for rotting at the rear corners, and mine was no exception. Water had gotten in over time after the original seals got old and disintegrated. Because water always flows downhill, the moisture migrated to the 50-year-old rear corners, rotting them.


This is the right-rear corner. It was so soft from rot that I could pull it apart with a fingertip.


This is the same piece of the framing, higher up. The rot extended up about another foot, and went sideways into some horizontal framing pieces. The corresponding large frame piece on the other side was almost as bad. (Note the darker brown wood that's under the insulation--that's the backside of the interior paneling.)


The old frame pieces, before they were removed up to the point of healthy wood, were used as patterns to make new ones. Each one was custom-cut from a 1x6 piece of new lumber.


During the pattern process, places for wiring holes were marked and drilled. The pieces weren't fastened on until the holes were done.


Each new side piece was sprayed on its back side with a fast-set wood glue. Then it was butted up beneath what remained after the rotted section was removed.


Here's the curb-side section, set into place.


Next, the rotted 1x2 frame pieces were replaced. (They were removed before the side pieces went on.)


These pieces provide structural support, as well as surface area for nailing and connecting the side pieces.


Here is a completed rear corner. (You'll note some discolored old wood; it was allowed to remain as it wasn't rotten.)


And, here's the completed rear-end rot repair job, ready for new insulation to be added before the skin goes back on.

Cost: About $40 in lumber, and $20 for each 4x8 section of foam board insulation. As long as the skin was lifted, I went ahead and replaced as much old insulation as possible, all the way around.

We put the skins back on, then painted the trailer, and reinstalled the windows, door, vents, J-rail, and other trim with new butyl tape and edge sealant.

The finished product:


Friday, September 4, 2015

Rot Repair 101

Has this happened to you? You buy a vintage travel trailer, all excited. You get it home, pull back the cushions (which you should have done before handing over the cash), and you see something like this:

Rotten, warped, mildew-stained paneling, indicative of water damage.


Now what?

If you're a newbie, you may be tempted to paint over it, put the cushions back in place, and call it good.  Or to tack another piece of paneling over the bad spot. These may be cosmetic solutions. But they aren't safe solutions. And here's why:


What you have here is the trailer equivalent of Stage 4 cancer. Left untreated, the prognosis is poor-to-deadly. For moisture to have reached the interior wood, it first must have penetrated the seals on the exterior metal skin. Then the moisture attacks the wooden framing that gives the trailer its shape and structure, eventually rendering it structurally unsound.

Only after that does moisture reach and begin to rot the paneling. See the broader expanses of the horizontal wood, above? That's the back side of the paneling--the same paneling you see on the inside. The paneling itself is only an eighth-inch thick. That, some thin insulation, and the exterior skin, are all that stand between you--the owner/occupant--and the forces of traffic and nature. If you don't fix this problem, it will only spread and get worse.

Because it occurs from the outside in, that's how you have to fix it to do it right. In other words, you have to take the trailer apart from the outside, remove the bad wood, replace it, and put the trailer back together.


To do that, you first must remove the J-rail. This is the aluminum trim that wraps around the edges of the exterior.


The lights, windows, and license plate holder also have to come off. This is so you can loosen and either lift or remove the corresponding section of metal skin.


The old insulation also needs to go. As long as you're in there, you might as well replace it anyway.


Now you can start to assess the rot and take inventory of what will need replacing.


A side panel (maybe more than one) may need to come off in order for you to have best access to the repair areas.


Here's a close-up of a rotted rear corner support. It fell apart to the touch, as did much of the other rotten wood. This isn't what you want to have between you and the outside world as you're going down the freeway. One bump or pothole, and the back corner could collapse.


The actual repair phase of this trailer is about to begin. Check back for photos of the process.